
Rendering Projects That Use Third-Party Add-ons
A render node runs a clean Blender with your project and nothing else. If your scene depends on an add-on that is still doing work when the frame renders, that add-on has to arrive with the file or the result will not be the scene you built. This guide covers how to tell which add-ons matter, what happens when one goes missing, and the three ways to deal with it.
Why Add-ons Are Different
A render node runs a clean Blender. It has your project and nothing else: not your preferences, not your asset library, and not the add-ons you have installed. Everything else your scene needs has to arrive with the file.
That is fine for most add-ons, because most add-ons have already finished their job by the time you save. An add-on that helped you lay out a building, retopologise a mesh or generate a texture produced real data, and that data is sitting in your .blend. Delete the add-on and the scene still renders identically.
The ones that matter are the add-ons that are still working at render time: those that generate or modify geometry when the frame is built, drive custom shaders or materials, or change the scene in any way as it renders. Remove one of those and the render is no longer the same scene. That single distinction is what this whole guide is about.
If you are not sure which kind you have, the honest test is to disable the add-on, reopen the file and look at it. If nothing changes, you have nothing to do.
What Goes Wrong When One Is Missing
There are two outcomes, and which one you get depends on the add-on.
- The job fails. Blender cannot open or process the scene without the add-on, the render stops, and the project lands in the Failed status on your dashboard. This is the good outcome, because it is obvious.
- The job renders, and the result is wrong. Blender opens the file, skips what it cannot resolve, and produces frames. Add-on driven geometry is absent, custom shaders fall back to defaults, and the images look plausible enough that nothing shouts at you. This is the expensive outcome.
Because the second outcome does not announce itself, do not rely on the farm to tell you. Rely on the evaluation instead.
The Test Frames Are Your Check
Every job is evaluated with a real test render of your own project before you are asked to pay for anything, and that evaluation returns four frames. Those frames come out of the same environment your full render will use, which makes them the exact place a missing add-on shows up.
So when the evaluation finishes, look at the frames for the specific things your add-ons are responsible for: the geometry they generate, the materials they drive, the effects they add. Not at the image in general. If those elements are there and correct, the add-ons arrived. If they are missing or rendering with default materials, stop and fix it before committing to the render.
This check costs you nothing. The evaluation is free, and it happens before any priority is chosen. Setting up a new render covers the evaluation step in full.
The Best Answer Is to Bake It Down
Before reaching for any of the shipping options below, ask whether the add-on needs to run on the farm at all. In a great many cases you can convert what it does into ordinary Blender data and remove the dependency completely:
- Apply procedural geometry so the result becomes real mesh data in the file.
- Bake textures and materials that an add-on is generating, into image textures your scene can use directly.
- Bake animation to keyframes where an add-on is driving motion.
We recommend this wherever it is feasible, and for two separate reasons. The obvious one is compatibility: data that is already in your file cannot go missing. The less obvious one matters more over a long render. An add-on that evaluates every frame on every node costs you time on every frame on every node. Baked data is read, not computed, so the same job finishes faster and therefore cheaper.
Baking down is not always possible, and when it is not, the farm supports keeping your add-ons active at render time. That is what the rest of this guide covers.
Shipping the Add-ons With Your Project
BoltRenders can deploy your add-ons onto the render nodes so they are active while your project renders. What you have to do depends on how you submit.
With LaunchControl: Nothing
If you submit through LaunchControl, this is already handled. The Sync Add-ons preference is enabled by default, and with it on the add-on collects every add-on currently active in your Blender and ships them with the project.
It applies to both ways out of Blender: Submit to BoltRenders and Export Packed Zip. You do not press an extra button and there is no folder to assemble. The setting lives in Edit → Preferences → Add-ons → BoltRenders LaunchControl, in the Export / Upload Settings group, and Exporting and submitting from Blender covers it in detail.
This is the recommended route, and not only for convenience. It reads the live state of your Blender each time, so it cannot ship a stale set.
By Hand: Collect, Then Zip
If you are uploading through the website rather than from Blender, the add-ons have to be inside the archive you upload, in the layout the farm expects.
The reliable way to produce that layout is LaunchControl's Collect External Add-ons button, in the Preparation Suite. It scans your Blender for every enabled external add-on and writes them into a correctly named folder beside your .blend file.
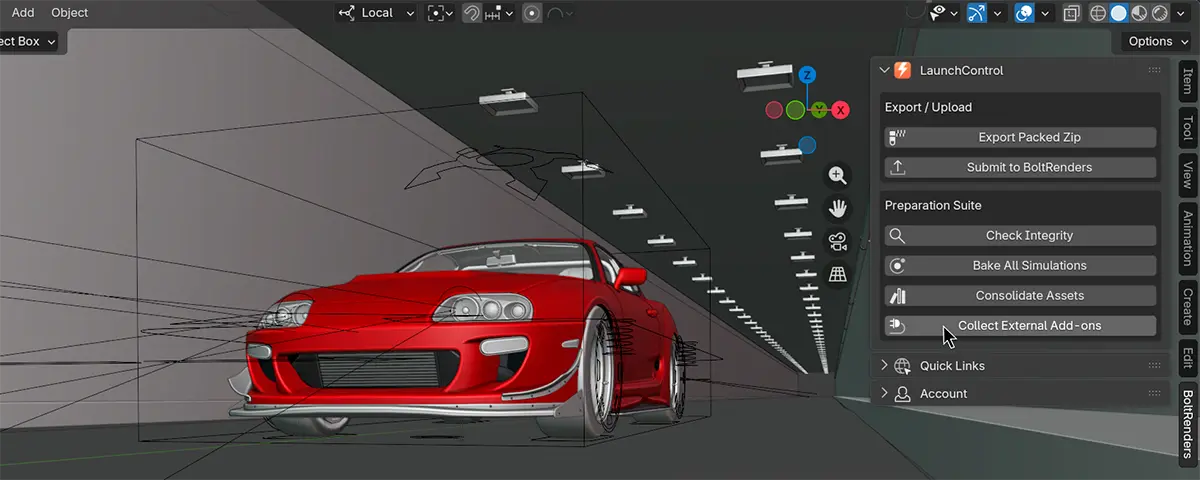
Do not rename, move or edit that folder. Its exact name and structure are how BoltRenders identifies the add-ons and deploys them on the nodes. A folder that has been tidied up is a folder the farm will not recognise.
Then package the project as a single .zip, with the .blend file and the add-ons folder at the same level inside the archive. Upload that zip the way you would upload any other project, and the farm handles the rest.
Keeping It Current
Both routes work from the add-ons that are enabled in your Blender at the moment you press the button. Two consequences follow, and both are usually what you want.
An add-on you have installed but left disabled does not travel. If your scene depends on something you have switched off, switch it back on before you submit.
And if you use the manual route, re-run the collection after installing or updating any add-on. The folder is a snapshot, not a live link, and an old snapshot will happily ship a version that no longer matches the one your scene was built with.
Before You Commit
A short pass before you turn an evaluation into a render:
- Have you baked down what you can? Anything applied is one less thing to go wrong, and it renders faster.
- Is every add-on your scene still needs actually enabled in your Blender right now?
- Did you submit through LaunchControl, or include a freshly collected add-ons folder in your zip?
- Do the four evaluation frames show the add-on driven parts of your scene, correctly?
If the last one is yes, the farm has everything it needs, and the full render will look like the test frames did.