Miracles and Wonders of OpenEXR
Published on
When rendering animations in Blender, many artists default to using PNG image sequences. However, while PNGs are convenient, they have significant limitations—particularly in retaining dynamic range and flexibility for post-production. In this guide, I will explain why switching to OpenEXR (EXR) can dramatically improve your workflow, preserve crucial image data, and ultimately save you time and effort while providing a better result.
The Problem with PNGs
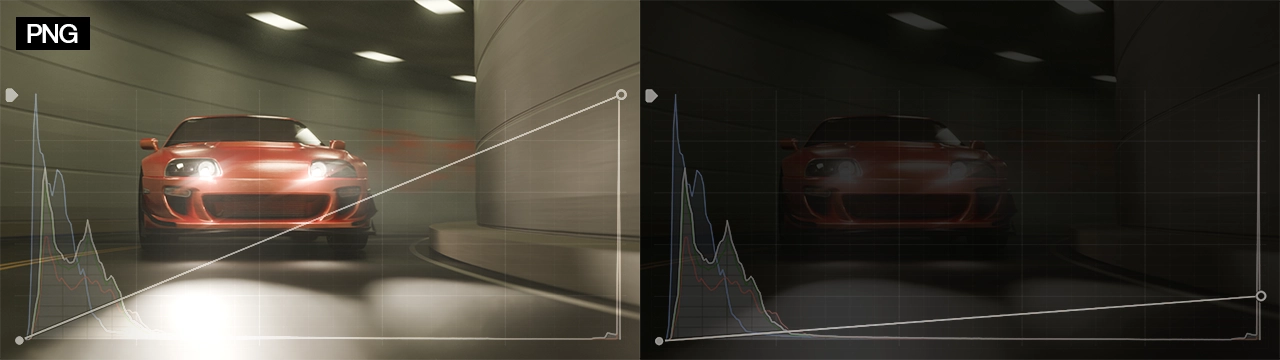
By default, Blender’s output file format is set to PNG. While PNG is a widely used format and technically lossless for many purposes, it comes with significant limitations for professional rendering workflows. PNG is a raster image format designed for standard dynamic range (SDR) images, which means that pixel data is baked and limited to a narrow brightness range. As a result, any intense highlights or overexposed areas in your render are permanently clipped to the SDR range and cannot be recovered later in post-production.
For example, if you render a scene with bright lights shining directly into the camera and later lower the exposure, you will find that the blown-out highlights simply turn dull gray rather than revealing any true detail — because that information no longer exists in the file. Once clipped in a PNG, that highlight data is lost for good. This is precisely why relying on PNGs for professional-grade rendering and color grading is far from ideal.
How EXR Solves This
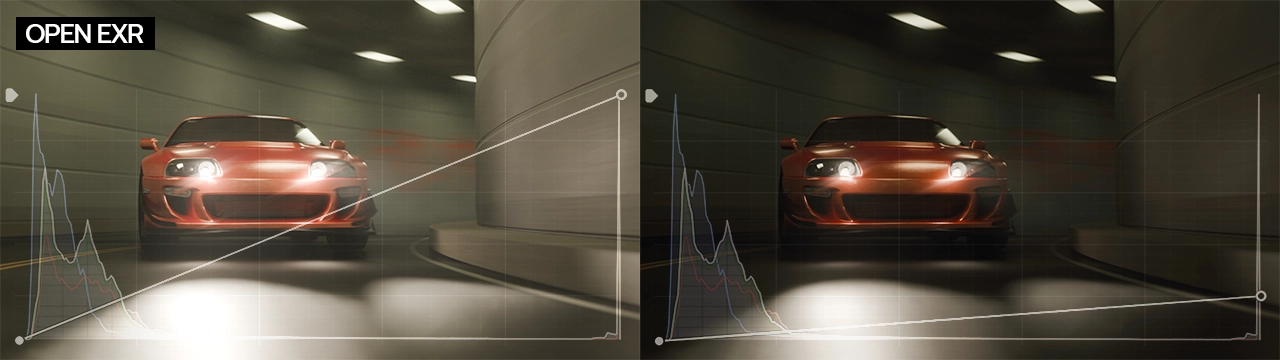
OpenEXR is a high dynamic range (HDR) image format widely used in professional visual effects. Unlike PNG, EXR stores full floating-point data, which means you can freely adjust exposure and color in post without losing highlight or shadow detail. It’s like working with raw camera footage rather than a baked-in JPEG.
When rendering in EXR, you retain all the lighting and color information your scene generates, ensuring maximum flexibility for color grading and compositing.
How to Export EXR Sequences in Blender
Here’s how to switch from PNG to EXR in Blender:
- Open the Output Properties panel.
- Under Output, set the File Format to OpenEXR (not multi-layer, unless you specifically need all render passes).
- For most use cases, select the DWAA (Lossy) compression codec. Unlike ZIP compression, which produces very large files, DWAA applies gentle lossy compression that significantly reduces file sizes—often smaller than PNGs—without noticeable image degradation.
- Specify your output directory and render your animation as usual.
In testing, DWAA-compressed EXR sequences are smaller than PNGs while providing far superior color data retention.
Preparing to Work with Your OpenEXR Image Sequence
Once your animation is rendered as an OpenEXR image sequence, the next step is to transform this raw, high dynamic range data into your final, polished video. OpenEXR files store linear, unclipped image data directly from Blender’s render engine—this means nothing is “baked in”: no contrast curves, no color grading, no view transforms. While this is exactly what makes OpenEXR so powerful, it also means that these files are not immediately ready for delivery; they must be processed, graded, and encoded into a standard video format.
It’s important to understand that not every video editing application can handle OpenEXR sequences effectively, but editors like DaVinci Resolve, Nuke, or Fusion are designed to handle this high-bit-depth image format properly. For the purpose of this guide, we’ll be using DaVinci Resolve, which is both free for most users and exceptionally well-suited for color grading workflows.
Importing EXR Sequences in DaVinci Resolve:
In the Media tab, locate your EXR image sequence on your disk.
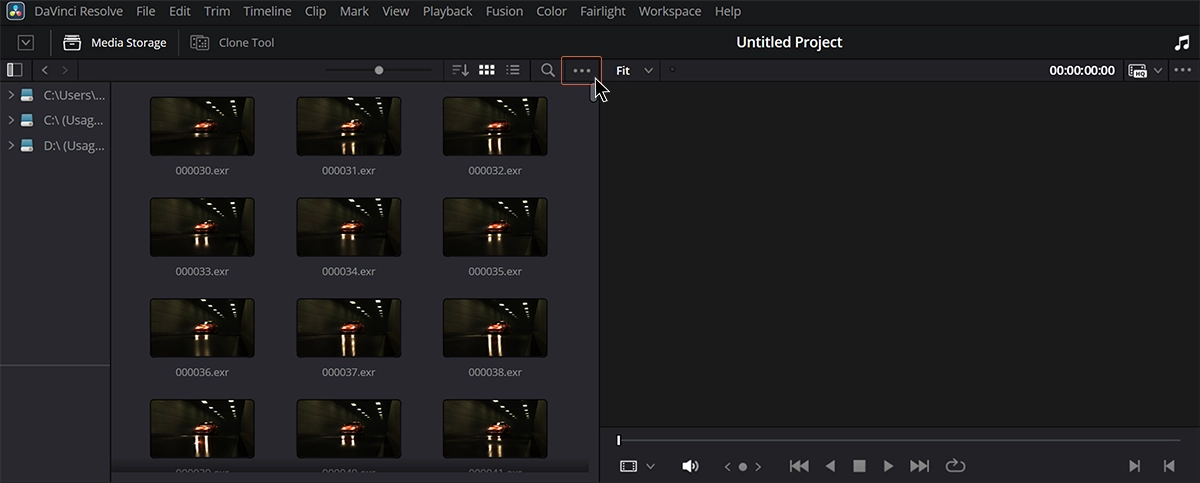
Navigate to your image sequence folder in Resolve. Click the three-dot menu and enable Frame Display Mode → Sequence so Resolve treats the frames as a single clip.
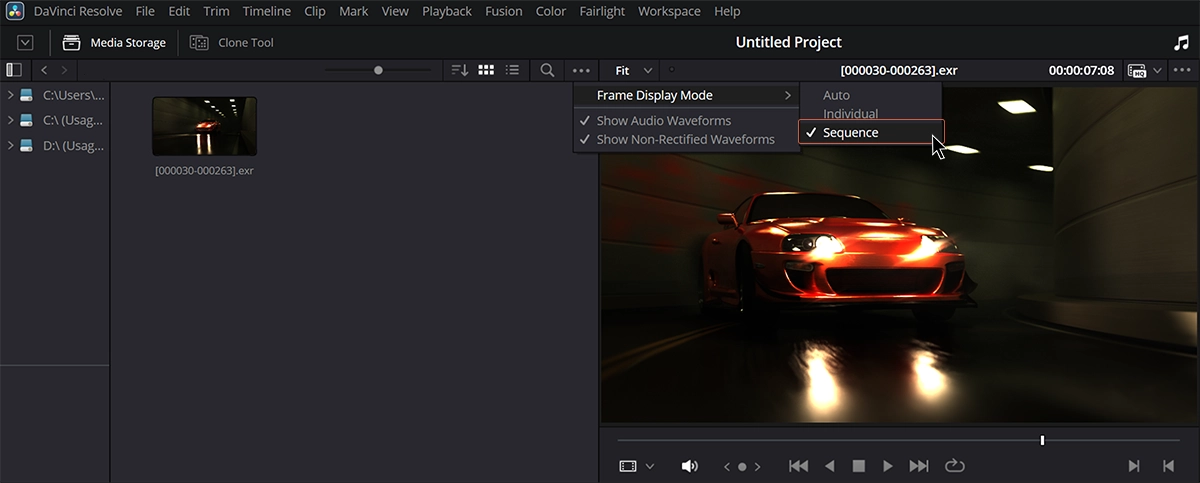
Enable Frame Display Mode in Resolve. - Import the sequence into your media pool and add it to your timeline.
Unlike PNG sequences, raw EXR will appear super dark by default. The image is linear and unprocessed, so we’ll learn what’s going on and how to handle it in the next section.
Understanding and Transforming Raw OpenEXR Data
When you export your animation as an OpenEXR image sequence, you are saving your render in its purest form: linear, unclipped, high dynamic range data exactly as Blender’s render engine produced it (by default in Linear Rec709 color space). This is what makes OpenEXR so powerful — you retain all the color and light information, allowing maximum flexibility in post-production. However, this also means that the images are not immediately ready to view as you saw in Blender’s viewport.
In Blender, the final image you see on-screen is not linear data; it has a view transform applied — like the Filmic or AgX transforms — which maps the raw scene-referred data to a display-referred look with natural contrast and highlight roll-off. When you export a PNG or JPEG, this transformation is baked in. With OpenEXR, it is not: you must reapply this transform manually in your compositing or editing software to get the same result.
To do so, the footage must first be tone-mapped (from linear to scene encoding) and then color-graded to achieve the desired final look. To make this process straightforward, we provide a custom LUT pack specifically for DaVinci Resolve. This pack includes:
- BaseTransform LUT: correctly maps your linear EXR data to a standard ARRI Log color space with wide gamut, ideal for subsequent color grading.
- Blender Transform LUTs: recreates Blender’s signature Filmic and AgX contrast and dynamic range, giving your footage the same natural highlight roll-off and pleasing midtones you expect.
In the next section, we’ll cover exactly how to apply these LUTs in DaVinci Resolve. This approach removes the guesswork and saves you from having to manually replicate Blender’s color management pipeline. By using the provided Filmic LUTs, your OpenEXR footage will match the look of your Blender viewport while preserving all the raw data. This means you’ll have complete freedom to fine-tune exposure, contrast, and color with professional-grade control — without losing any image information.
Applying the Filmic View Transform in DaVinci Resolve
Before you can match your OpenEXR footage to Blender’s viewport look in Resolve, you need to install and apply the provided LUTs. Follow these steps to set up your color management pipeline properly:
Install the Blender ViewTransform LUTs:
- Download the Blender ViewTransform LUTs pack included with this guide and extract it.
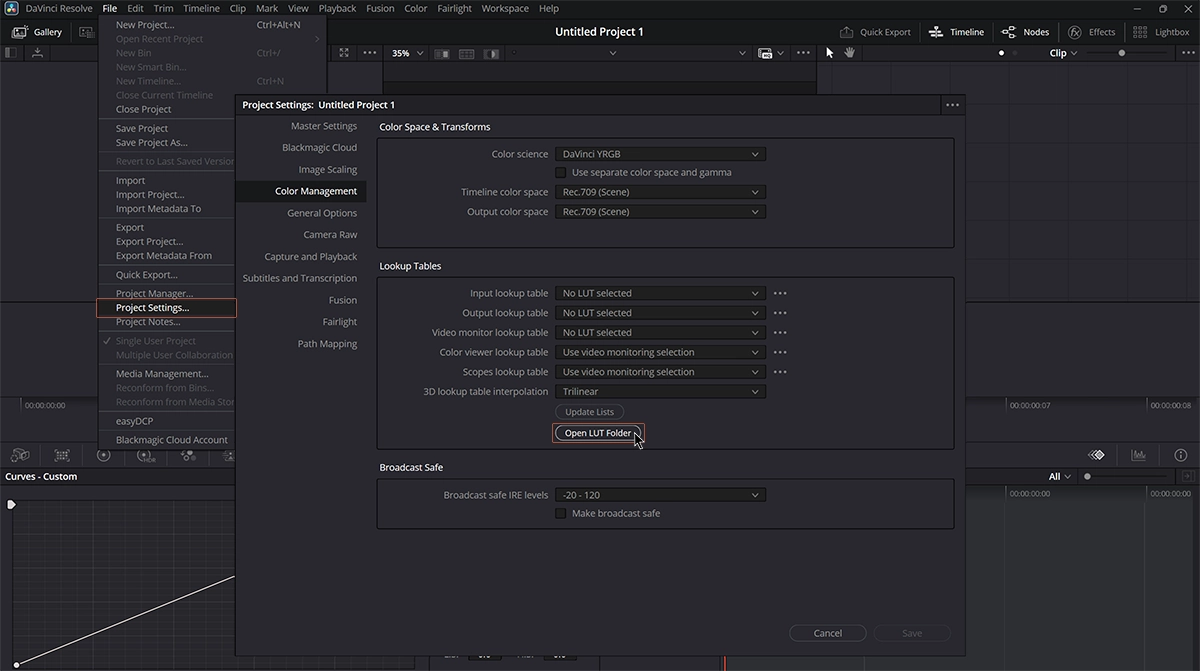
- In DaVinci Resolve, go to File → Project Settings → Color Management → Open LUT Folder.
- Copy the entire extracted LUTs folder into the directory that opens.
Refresh the LUT library:
- Back in Resolve, click Update Lists in the same settings window to make sure your new LUTs appear in the LUT browser.
Opening LUT folder in DaVinci Resolve. Apply the LUTs using nodes:
- Switch to the Color tab.
- In the node graph, create a new Serial Node and apply the first LUT — BaseTransform — to convert your linear OpenEXR data to an ARRI Log color space.
- Then, add another Serial Node and apply your chosen Blender View Transform LUT, such as the Filmic Base Contrast LUT, to replicate Blender’s Filmic contrast and highlight roll-off.


This two-step node setup precisely recreates Blender’s Filmic view transform while keeping your source data unclipped and flexible. From here, you can build your grade freely: add nodes before or after the Blender View Transform, apply detailed color corrections, or experiment with creative look LUTs — all while preserving the integrity of your raw EXR files.
Note on Filmic and AgX View Transforms
You’ll notice that both the Filmic and AgX view transforms we provide include only the Base Contrast version — without additional Blender looks like Medium Contrast, High Contrast, or Very High Contrast. This is intentional: in a professional OpenEXR workflow, it is best practice to work in Blender with Base Contrast only. Doing so keeps your eyes unbiased during lighting and look development, revealing the true dynamic range and allowing you to judge your light setup without extra baked-in contrast masking possible improvements.
In short, keep your scene in Base Contrast inside Blender, export your renders as OpenEXR sequences, and complete your creative grading in Resolve using the provided LUTs. This workflow guarantees consistent color management, maximum control, and a polished final image that truly shines.
Quick Way to Preview EXR Sequences
To quickly review EXR image sequences without opening Blender or Resolve each time, use an open-source EXR viewer like DJV. DJV can play back EXR sequences in real-time, view individual RGB channels, adjust exposure interactively, and even apply Filmic transforms by loading the same configuration Blender uses (config.ocio).
Conclusions
By adopting a professional OpenEXR workflow and properly replicating Blender’s Filmic or AgX view transforms in DaVinci Resolve, you unlock the full creative potential of your renders. You’re no longer limited by clipped highlights or baked-in looks — instead, you gain complete control over color, exposure, and artistic style in a true grading environment.
Working this way keeps your lighting honest during production and empowers you to craft a polished, cinematic final image in post. Use the provided LUTs as your foundation, then push your look further with precise adjustments and your own grading flair.