How to Prepare a Blender Project File for Rendering on BoltRenders
Published on
To ensure your Blender project renders seamlessly and efficiently on BoltRenders, it's crucial to prepare your file properly. By following this guide, you can avoid missing files, broken textures, or other errors, while also maximizing rendering speed, minimizing transfer times, and in the end reducing your costs.
Prepare generic animation projects
In general, while uploading a zip file with your .blend file and external assets is an option, packing all assets and textures into a single .blend file makes the process faster and more efficient.
Convert Linked Assets to Local Assets
If your project contains linked assets from other .blend files, external locations, or online resources, these assets must be converted to local assets. This process ensures they are fully imported into the .blend file, preventing issues during rendering.
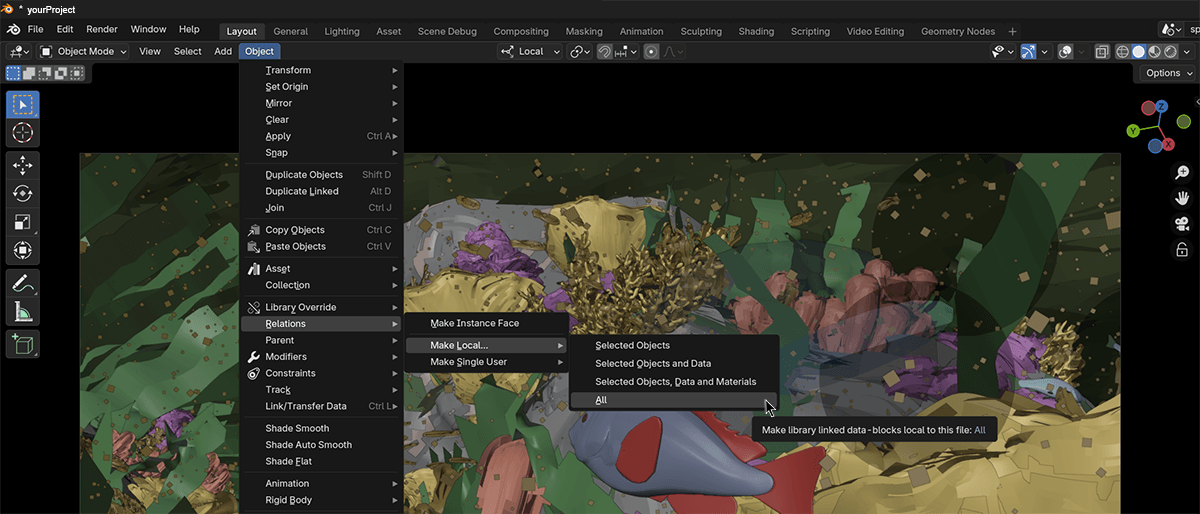
Steps to Make Linked Assets Local:
- Go to the menu bar and navigate to: Object → Relations → Make Local... → All
- Click on All to ensure all linked objects are fully imported into the file.
Verify in the Outliner that the linked icon is no longer present for any objects.
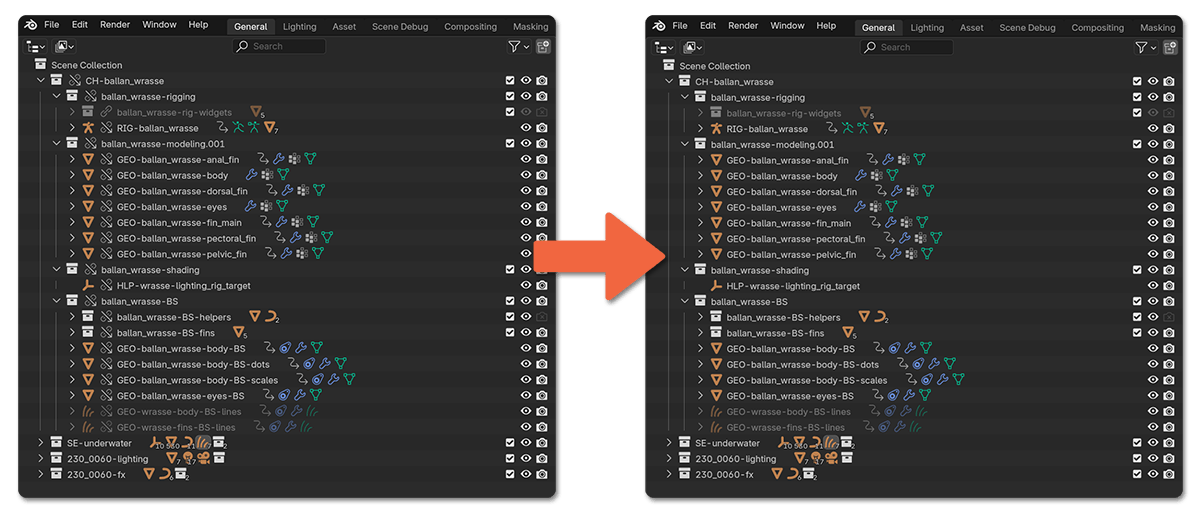
By making all linked assets local, you ensure the integrity of your project on BoltRenders.
Pack All Resources
Now, the simplest option, if you are confident that all assets are already in your project folder, is just to zip up the entire project folder and submit it. This will usually work fine. However a much better practice, and what we always recommend, is to pack your assets directly into the .blend file.
Steps to Pack Resources:
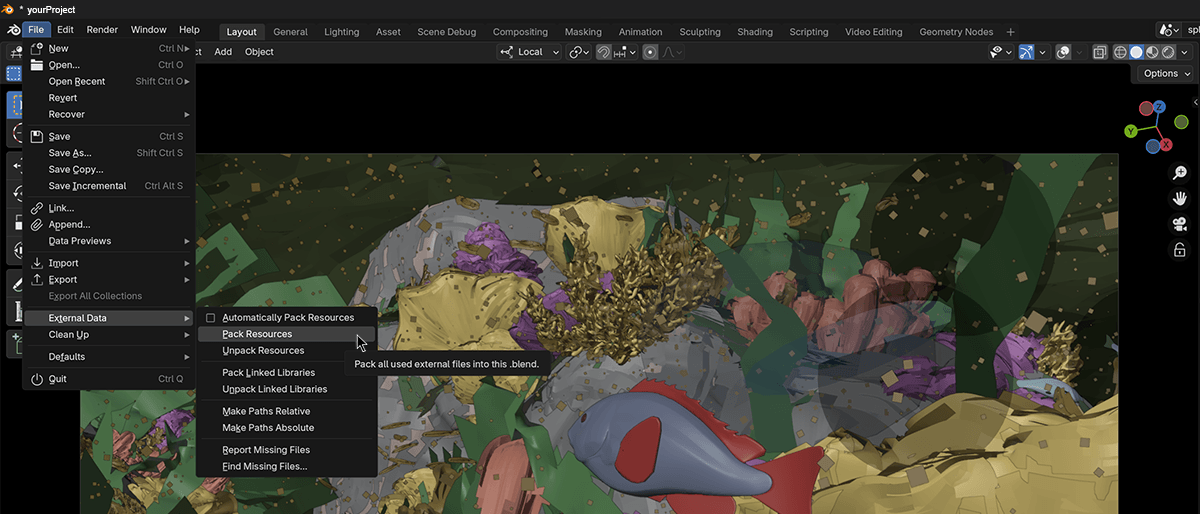
- Navigate to the top menu and select: File → External Data → Pack Resources
- Click on Pack Resources. Blender will gather all external resources (e.g., textures, HDRI maps, etc.) and embed them into the
.blendfile. Click also on Pack Linked Libraries in the same menu.
This will pull in textures, HDRIs, images, and many other file types, so the .blend becomes largely self-contained. Packed files generally load faster on render farms and give you more consistent performance which is why this is considered the professional way to prepare a project.
If your project contains linked assets, make sure to convert them to local assets first by following the steps in the previous section. Once all linked assets are local, proceed to pack the resources. If your project does not have any linked assets, you can directly pack the resources.
It is important to note that not every type of file can be packed. For example, movie clips, simulation caches, and some font files cannot be embedded into the .blend. In these cases, even after packing, you should still make a zip file that includes your project folder along with those external assets. Just make sure paths are set to relative, so Blender knows where to find them. A quick way to do this is by going to File → External Data → Make All Paths Relative.
Save the File
Once all assets are local and resources are packed, save your project to finalize the preparation. Keep in mind that the file size will increase, as it now contains all embedded assets.
Recommended Saving Practices:
- Save the file as a new version to maintain a backup of your original project. For example, if your file is named project.blend, save the packed version as project_packed.blend.
- Use the packed version exclusively for rendering on the farm, while retaining the original modular project for your own use.
The packed .blend file is now self-sufficient and ready to upload to our render farm without requiring any additional files.
Why Packing Assets Matters
Packing all resources into a single .blend file ensures:
- Faster Transfer Speeds: A single file is quicker to distribute on machines than multiple files.
- Error-Free Rendering: Eliminates the risk of missing textures or broken asset links.
- Cost Efficiency: Optimized preparation reduces rendering time and associated costs.
Prepare projects with simulations
When preparing a Blender project for distributed rendering on a render farm, packing all assets is essential — textures, linked libraries, fonts, and other dependencies must be self-contained. However, if your project includes simulations (fluid, cloth, rigid body, or particle-based), there is one absolute rule you must follow: All simulations must be baked and their caches saved.
Without properly baked caches, simulation data will not be available to the render nodes, causing frames to render incorrectly — or not at all. This is not a hardware limitation, but simply the nature of how Blender handles simulations.
Below is a breakdown of how to correctly prepare the most common types of simulations to ensure a smooth rendering experience with BoltRenders.
Fluid Simulations
Fluid simulations are among the most visually striking effects you can create in Blender, but they require deliberate preparation to render correctly on a farm. Unlike other simulation types, fluid simulations rely entirely on external cache data — if this cache isn’t properly baked and included with your project, the simulation simply won’t appear during rendering. This is also one of the few cases where Blender cannot embed the cache within the .blend file. Instead, the cache must be saved to an external folder, and both the .blend file and cache directory must be packaged together into a single .zip archive before uploading.
To get started
- First, create a folder named “cache” (or any name you prefer) in the same directory as your
.blendfile. This will contain the simulation data after the bake. - In Blender, select your fluid domain object and open the Physics Properties tab.
- In the Cache section, set the path to the cache folder you just created.
- Ensure the cache path is relative to the project file by going to File → External Data → Make All Paths Relative.

Once your paths are set:
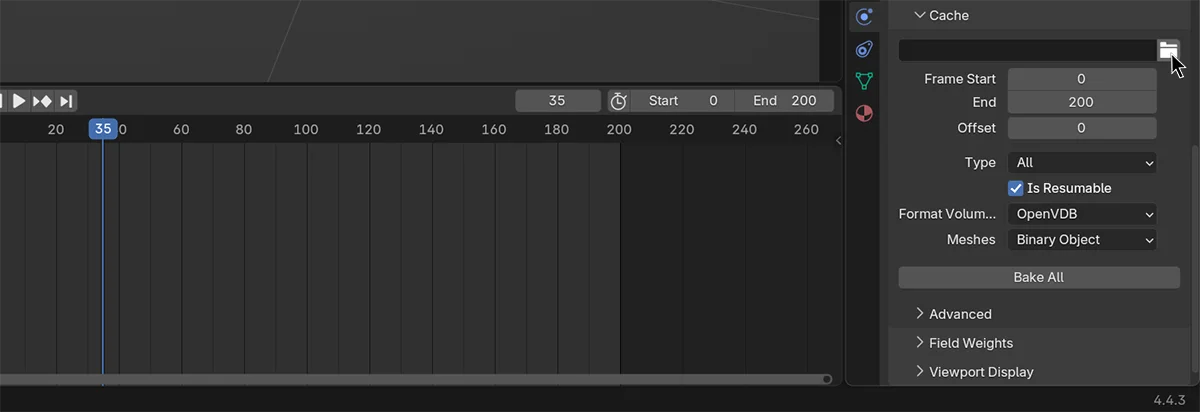
- Choose the cache type as “All” to include every element of the simulation.
- Click “Bake All” and wait for the process to complete.
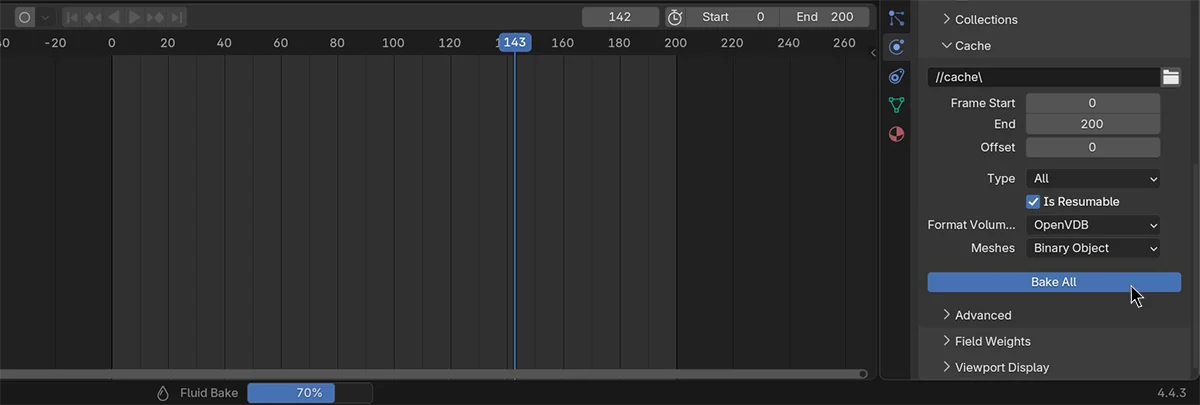
After baking, do not forget to save the blend file. Then, package your .blend and the full cache folder together into a single .zip file. Only then is the project ready to upload to BoltRenders.
Cloth Simulations
Cloth simulations are simpler to manage in many cases because their cache can be embedded directly into the .blend file — as long as you follow a few critical steps.
Begin by selecting the cloth object and navigating to the Physics Properties panel. Inside the Cache subpanel, you’ll see something called the "Active Point Cache Index." You’ll need to give this cache a name — this is essential. Blender won’t embed unnamed caches, and the simulation will be lost during render.
With a named cache:
- Make sure your simulation frame range covers the entire animation.
- Click “Bake All Dynamics” and wait for the baking to finish.
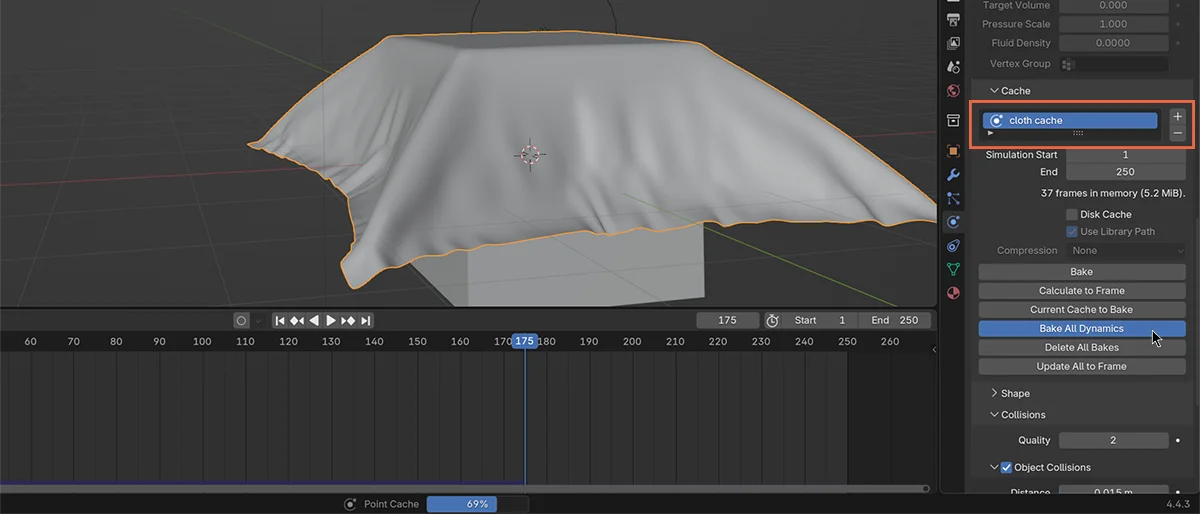
When the bake completes, a solid blue bar will appear along the timeline, indicating the cache has been successfully stored. Save the blend file at this point — the simulation data is now embedded and will travel with the .blend to the render nodes automatically. No extra folders or packaging required.

Rigid Body Simulations
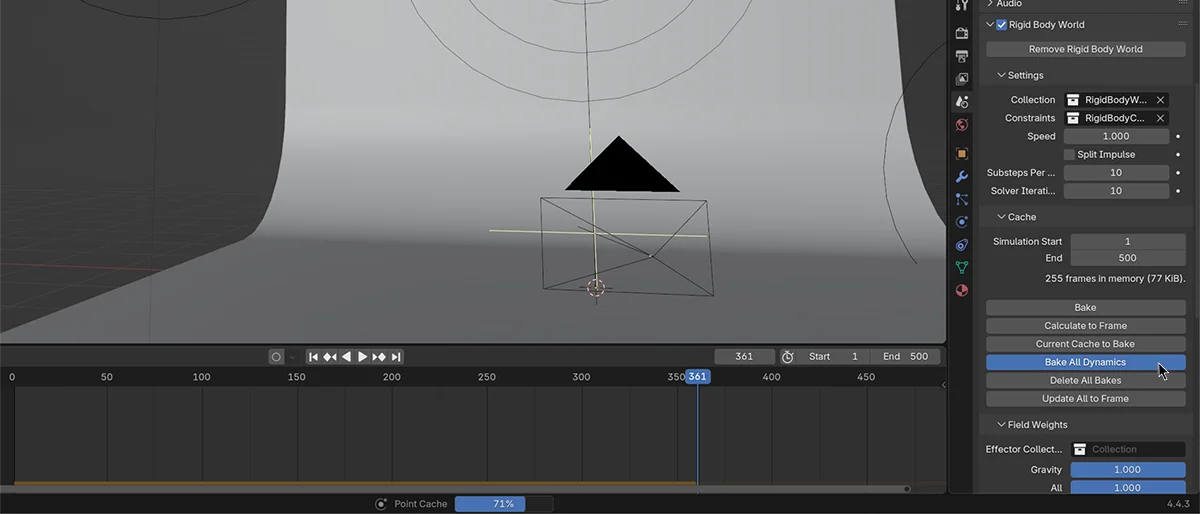
Rigid body simulations have their own unique cache system. Instead of being managed from the object level, the bake settings are found under Scene Properties, inside the Rigid Body World section. There, ensure the start and end frames of the simulation match your full animation range. Then:
- Click Bake All Dynamics” to cache the simulation.
- When done, you’ll see a solid yellow bar in the timeline — a visual confirmation that the simulation is baked.
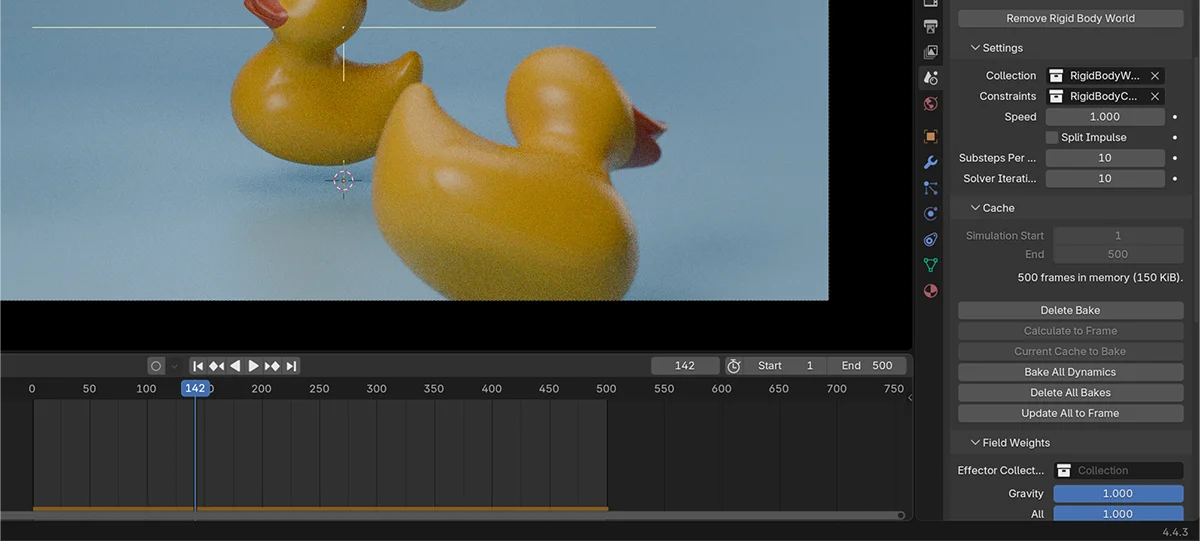
At this point, saving the blend file will preserve the baked data. However, if you want to go a step further — perhaps to lock everything down or speed up the render — you can convert the baked motion into standard keyframes:
- Select all objects affected by the rigid body sim.
- Use Object → Rigid Body → Bake to Keyframes.
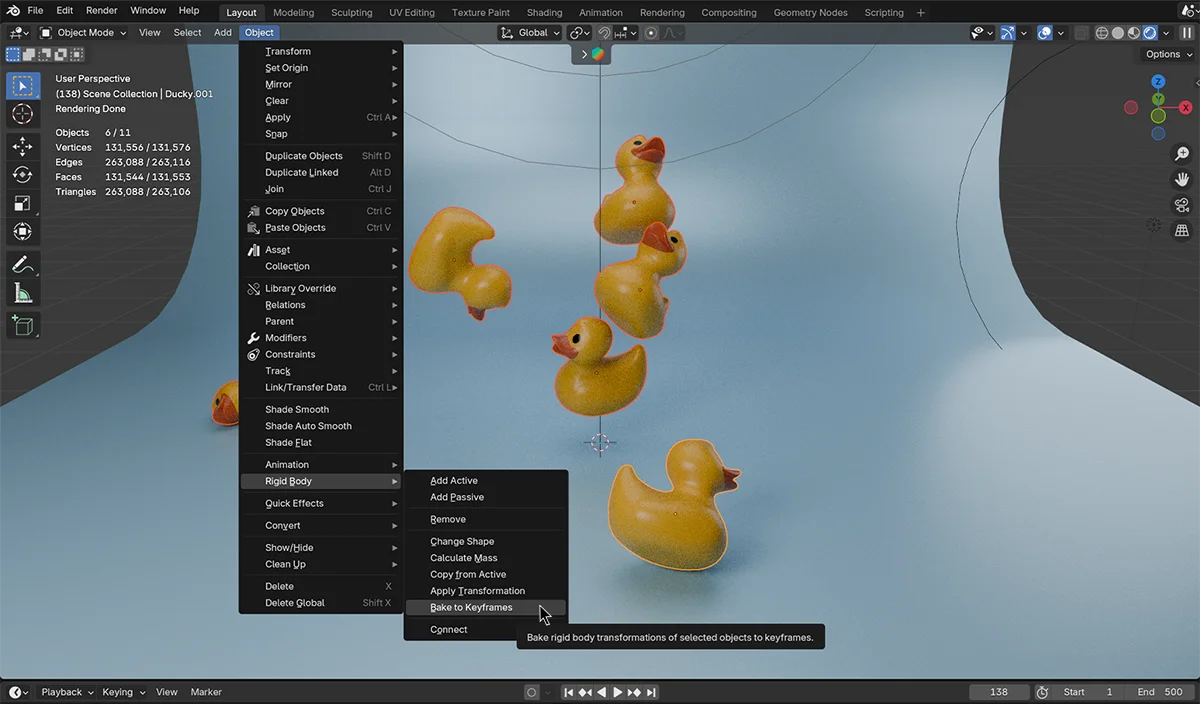
This will convert the physics simulation into regular keyframe animation — a rock-solid way to ensure nothing changes at render time.
Particle Systems
Particles that rely on physics (like boids or emitter types) also require baked caches to render predictably. The process here is similar to cloth simulations.
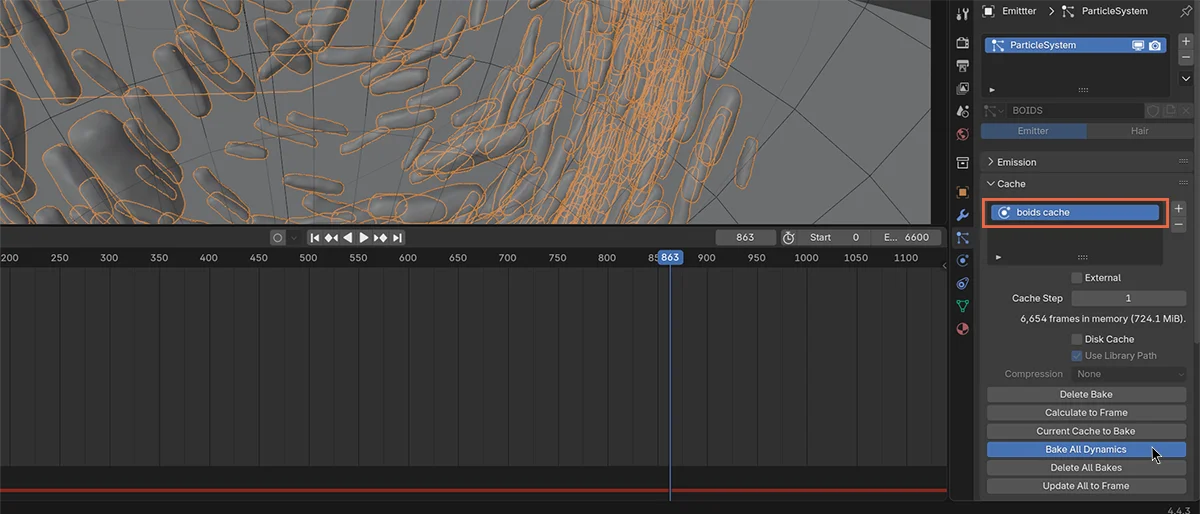
Select the emitter object and go to the Physics Properties panel. In the Cache section, ensure the cache index is named — again, unnamed caches will not be saved. Once named:
- Confirm your frame range covers the full animation.
- Click “Bake All Dynamics” and wait for it to complete.
When the simulation finishes baking, save the .blend file. For most particle systems, this will embed the cache directly into the file — no external folders required.
Final Checks Before You Upload
Before uploading your project to BoltRenders, take a moment to verify the following:
- All simulations (fluid, cloth, rigid body, particle) have been baked completely.
- Any external cache directories (used in fluid simulations) are included and zipped with the
.blendfile. - All paths are relative (File → External Data → Make All Paths Relative).
- You've saved the
.blendfile after baking — otherwise, your baked data won't be preserved. - The final .zip includes everything needed to run the simulation on another machine.
Prepare projects that use third-party add-ons
If your scene relies on third-party add-ons that must remain active during rendering, for example add-ons that generate or modify geometry, handle custom shaders, or affect the scene in any way at render time, those add-ons need to be available on the render nodes as well. Simply packing your assets and baking your simulations is not enough in this case: if a required add-on is missing on the farm, your project will either fail to render or produce incorrect results.
As a general best practice, we strongly recommend applying or baking as much as possible of what your add-ons are doing before submitting your project. Converting procedural results into actual geometry, baked textures, or keyframe data wherever feasible will improve both compatibility and, most importantly, rendering performance across the farm nodes. That said, if you cannot or prefer not to bake everything, BoltRenders fully supports keeping add-ons active at render time through our add-on sync system, as described below.
Collect Add-ons with LaunchControl
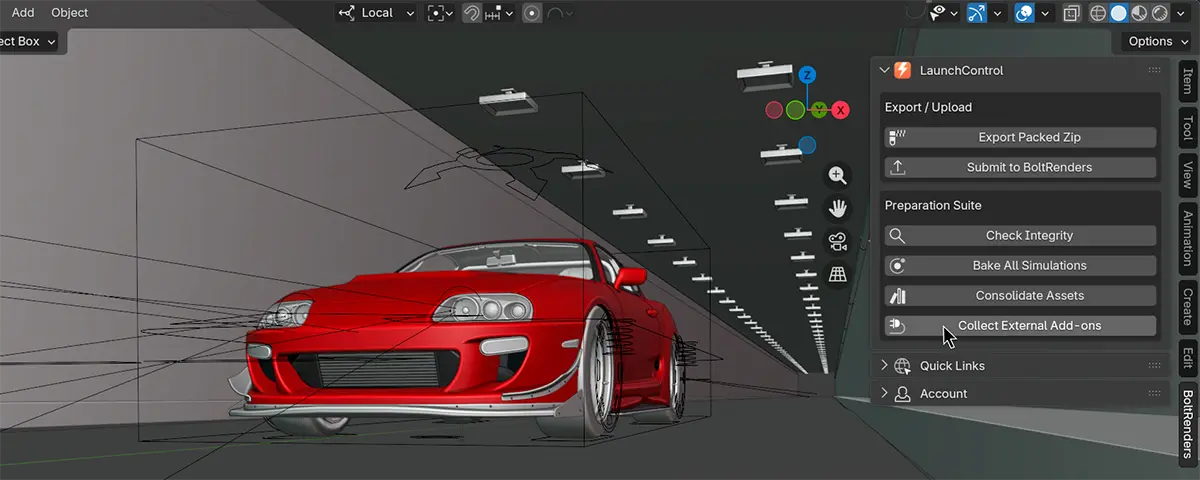
The right way to include third-party add-ons in your project package is to use LaunchControl, our Blender add-on. LaunchControl includes a dedicated button that scans your Blender environment for all currently enabled external add-ons and collects them into a properly structured folder, placed automatically alongside your .blend project file. This folder follows the exact naming convention and directory structure that BoltRenders expects, allowing the farm to detect and sync all required add-ons when your project is received.
Steps to Collect Add-ons:
- Open your project in Blender and make sure LaunchControl is installed and active.
- In the LaunchControl panel, locate and click the Collect Add-ons button.
- LaunchControl will automatically create the add-ons folder in the same directory as your
.blendfile, with the correct name and structure containing all enabled external add-ons.
Once the process completes, you will find a new folder sitting alongside your .blend file inside your project directory. Do not rename, move, or modify this folder in any way. Its name and structure are required for BoltRenders to correctly identify and deploy the add-ons on the render nodes.
Packaging the Project
After collecting the add-ons, the final step is to include everything in a single .zip archive. Make sure your zip contains the entire project folder, so that the .blend file and the add-ons folder are both present at the same level inside the archive. This is the only supported way to submit projects that depend on third-party add-ons.
Upload this .zip to BoltRenders as you would any other project package, and the farm will take care of the rest.
Always re-collect your add-ons before uploading if you have installed or updated any add-ons since your last collection, to make sure the folder reflects the current state of your environment.
Automate Everything with LaunchControl
Since we have introduced LaunchControl in this section, it is worth mentioning that its capabilities go well beyond collecting add-ons. All the preparation steps covered throughout this entire guide, from packing assets and libraries to collecting add-ons and assembling the final archive, can be handled automatically with a single click directly from Blender.
LaunchControl includes a button to generate a fully prepared and packed .zip file in one click, applying all the tasks described in this article automatically so you do not have to go through each step manually. And if you are ready to render straight away, there is a second button that packs and submits your project directly to BoltRenders without any intermediate steps.
If you are not using LaunchControl yet, you can find out more on the LaunchControl page.
Conclusions
When preparing Blender projects for render farms, a smooth and successful render begins with how you organize and save your data. One of the most effective ways to ensure consistency across all nodes is to pack all assets directly into the .blend file. This includes textures, images, linked libraries, and any external references your scene depends on. Packing everything into the file not only avoids missing asset errors, but also reduces loading time and streamlines the distribution of the scene across the farm, making your renders faster, cheaper, and more predictable.
Simulations, however, require special attention. Wherever possible, simulation caches should also be baked and saved inside the .blend file. Blender allows this for cloth, rigid body, and most particle systems, and doing so ensures the simulation data is self-contained, reducing the risk of broken behavior during distributed rendering.
That said, fluid simulations are the exception. Due to how Blender handles fluid data, these caches must be saved externally. In this case, using a .zip archive is necessary and fully supported: just be sure to include both the .blend file and the complete cache directory.
If your scene depends on third-party add-ons that must stay active during rendering, make sure to collect them using LaunchControl before packaging your project. As a best practice, apply or bake as much of what those add-ons produce as possible, both for compatibility and for better rendering performance. When that is not feasible, the add-on sync system will take care of the rest.
While .zip uploads are supported by BoltRenders and will work when needed, we recommend embedding everything directly in the .blend file wherever possible. It is the cleaner, more reliable solution: it minimizes errors, speeds up processing significantly, and lowers costs on your end. And if you want to skip the manual preparation steps entirely, LaunchControl can handle the whole process for you in a single click, from packing and collecting to submitting directly to the farm.